Pages

Wednesday, May 16, 2012

Homemade Potato Chips

I took the photos for this post about a month ago. I intended to write this post back then. I'm not going to apologize for not having stuck to my plan. Life got in the way. And that's all I have to say about that.

So, homemade potato chips. There is absolutely no reason to make homemade potato chips. You can drive around the corner to the grocery store and buy a bag for about two dollars. Or you can buy a bunch of bags, and not need to buy chips for a while. No need to spend time peeling and slicing and frying a sack of potatoes. Making homemade potato chips is ridiculous.

Ridulously fun.

Here's how you do it.

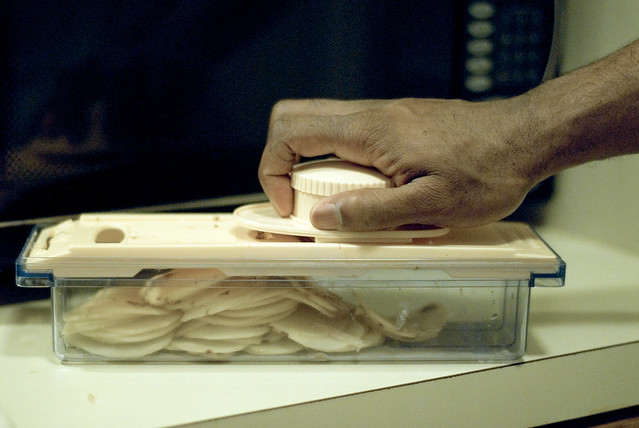
First, you peel and slice four to six Russet potatoes thinly. For the slicing, we used a gadget that used to belong to Kendal's grandmother. It belonged to her, but she had never used it. When Kendal's mom brought it back from Little Mama's house a few years ago, it was still in its original 1970s packaging, unopened. If we had heard of such a thing, we could have made an unboxing video about opening brand-new old stuff. But, we hadn't heard of such a thing, so we just used it to make potato latkes. And homemade chips.

Ahem.

_DSC0679

_DSC0677b

Soak the potato slices in a bowl of ice water for about 30 minutes. This removes the starch so that the chips will be crunchy.

_DSC0680

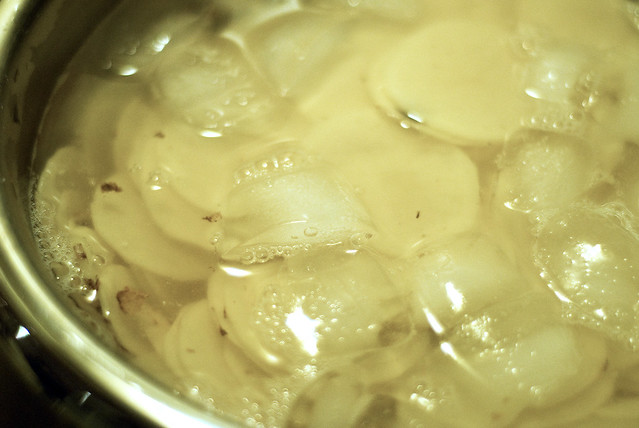
Next, dry the slices completely by laying them flat on paper towels.

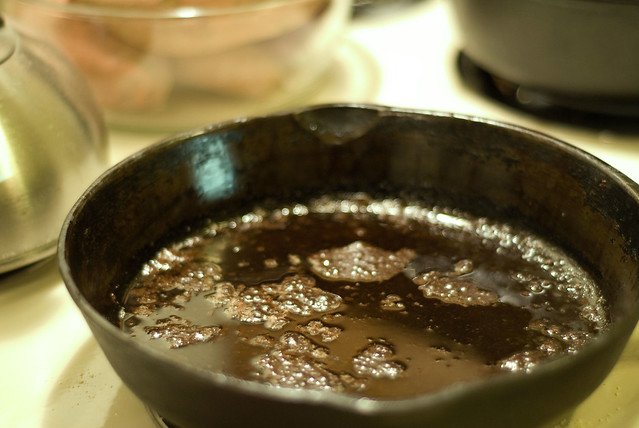
Pour about an inch of canola oil into a cast iron skillet and set the heat to medium high. To test if the oil is ready, either put one potato slice in to see if it begins to fry, or do the wooden spoon test.

Digression 1b*: The Wooden Spoon Test

Put the handle of a wooden spoon into the oil. If the oil begins to bubble pretty vigorously around the handle, the oil is hot and ready. I learned that tip from Sara Moulton. Don't feel left out--she didn't teach it to me personally. She used to have a show on The Food Network. You could have learned it from her, too.

Now that your oil is hot, place your potato slices into the skillet in a single layer. (You will have to fry the chips in batches, because four potatoes makes a lot of chips.)

_DSC0682

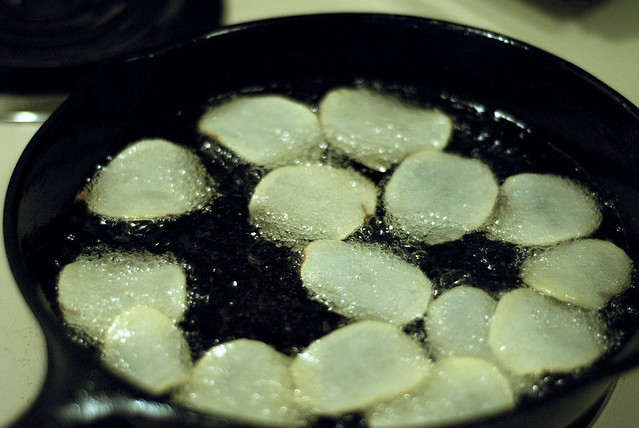
After a minute or two, check the under side of one of the chips to see if it is your desired shade of golden/brown. If it is, turn all the chips over.

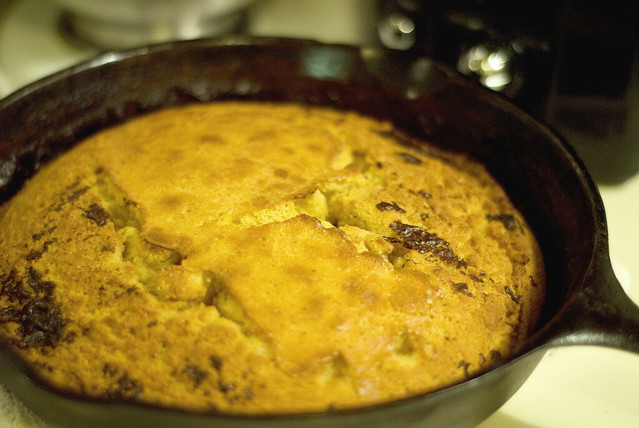
Once all the chips are browned how you like them, remove them and place them on a paper-towel-lined plate. Sprinkle them with salt and/or other seasonings while they are still hot and then allow them to cool completely. They should be nice and crispy. (I did notice that the lighter chips were a little soft. The chips of a deeper hue were perfectly crunchy.)

If you don't want to use all of the plates in your cabinet to cool your chips, layer a paper towel over the cool chips to be ready for the next batch. I actually used two plates and alternated them to ensure that each batch was completely cooled before placing another layer of paper towels on top.

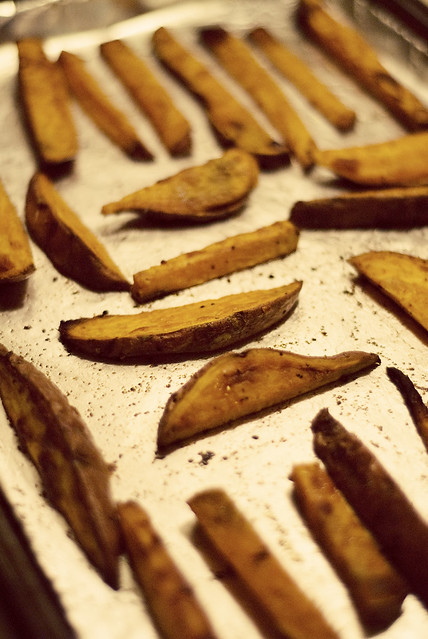
They should look like this when they're done:

_DSC0695

If they don't, you flunk. You'll have to repeat the class. But with a different teacher, because, obviously, I'm of no help to you.

Invite your friends over and eat these chips with dip on the same day you make them. I tried storing them in an airtight container, and I wound up with bendy, un-crunchy chips the next day.

You may want to experiment with different types of oil. (Like sunflower.)

Or you may just want to hop in your car and go buy a bag of Lays**.


*If I have to tell you what "Digression 1a" was, you weren't paying attention.

**Do I really need to tell you that this post was not sponsored?

Friday, April 13, 2012

I Drinks Me Spinach

Little known fact: I love the idea of vegetables, but I don't so much love actual vegetables. (Ok, this is probably a well-known fact.) I don't know how to cook them in a way that makes them palatable and un-boring. So, smoothies are my salvation...from scurvy.

I've been known (by my little sister) to make a pretty mean smoothie, but Kendal made today's.

The ingredients*, in proportions of your liking:

blueberries
mango bits
spinach
full-fat plain yogurt
apple-grape juice
honey

Put everything in the blender and pray that the motor doesn't burn out. (We're going to need a new one soon, I'm afraid, because lately ours sounds like it's moaning when we try to blend stuff.)

_DSC0680

This is supposed to be a "before" picture, but--confession--I didn't really plan this post. I walked by as Kendal started the blender, and I said, "Wait! I want to take a picture!" Hence, the partially-blended blueberries and spinach at the bottom.

_DSC0683

After. Confession--I didn't really drink this smoothie. I ate it with a spoon because it was so thick. But you can certainly make yours thinner and drinkable. And, unless you're overzealous with the green stuff, you can't taste the spinach. (I made one the other day, and I could taste the spinach, but I thought it was delicious anyway.)

Drink up!


*All ingredients were from Trader Joe's. The fruits and vegetables were all frozen, and were not thawed before blending.

Thursday, April 5, 2012

"Wing It" Mac 'n Cheese

So, this is a quickie before I get into some spring cleaning. Passover begins tomorrow night, and my family is coming in from out of town to join us for our congregation's seder. So, today, I'm going to be busy making things pretty for our guests and ridding our house of our last vestiges of leavened bread. That's easier said than done. (Have you ever tried to eat almost a whole loaf's worth of French toast in a day?) Every year I say I'm going to plan better. And every year Passover sneaks up on me and catches me unprepared. It's like I've never learned to use a calendar or something.

Anyway, here's something you can do if you're trying to use up the last of your noodles. I'm calling it "Wing It" Mac 'n Cheese, because Kendal whipped this up just using things he found in our fridge. (All edible things, thank goodness. We're not those weirdos who keep batteries in the butter compartment.)

First, you'll need to cook your pasta according to the instructions on the box. Kendal used cellentani, which is a sort of spirally macaroni noodle. Once the pasta is cooked and drained, add about 2 tbsp butter and a half cup of shredded cheese. (Cheddar and mozzarella in this case.) Next add 1/4 cup milk and one egg, and stir it all up. Place in a baking dish, and bake in a 350 degree oven for about 20 minutes or until it is browned to your liking.

Ours looked like this:

_DSC0530

And this:

_DSC0541

Just a note: add more cheese if you prefer really cheesy mac 'n cheese. This turned out a bit lighter on the cheese, which I liked, because I'm not a huge fan of globs and globs of cheese.

Ok, I'm off to clean. And prevent Miss M from eating crayons, which she seems to like more than mac 'n cheese these days. Oy!

Monday, March 26, 2012

Blueberry Pancakes

Alright, alright, alright. I know I said I had hoped to post a new recipe about once a week. And now it's been over a month. But, Miss M had been sick, and as she had never before been sick (aside from that one time in the hospital when she was a preemie), this was a new and all-consuming experience for all of us. She's all better now. No more fever. No more snot. Now let's talk about food!

On one of Miss M's sick days, Kendal made blueberry pancakes*. The first pancake of the batch was especially pretty (i.e., not burned). I'm glad I took pictures. But, I'm getting ahead of myself. First, you need ingredients.

1.5 cups flour

1/2 cup cornmeal

_DSC0512

1 tbsp baking powder (We use this kind. It's aluminum-free. Or if you're English, aluminium-free.)

1/2 teaspoon salt

1 tablespoon sugar

2 eggs

_DSC0508

1.5 cups milk (We used 1 cup vanilla almond milk and 1/2 cup whole cow's milk.)

2 tbsp butter (melted and cooled)

butter or oil for your cooking surface (Kendal used a well-seasoned cast-iron skillet, so he omitted this part.)

1 cup itty bitty wild blueberries (You can use regular-sized blueberries, but we just happened to have the itty bitty wild ones from Trader Joe's.)

_DSC0518c
No, those aren't magical sparkles. These blueberries are frozen. Don't defrost them before mixing them into the batter.

Preheat your skillet or griddle.

Combine the dry ingredients and wet ingredients separately. Then mix the wet ingredients into the dry ones carefully.

Fold in the blueberries last.

Pour enough of the batter into your skillet to make whatever size pancake you like.

_DSC0523

Cook until the bottom is browned (about 2 to 4 minutes), then flip over.

Cook the other side until it is browned.

_DSC0525

Repeat until you're out of batter.

Stack 'em up high.

_DSC0529

Serve with syrup, if you want. But, these will also taste awesome with honey and melted butter.


*Adapted from How to Cook Everything, by Mark Bittman (p.747-48).
All photos by robyn L. All rights reserved.

Thursday, February 23, 2012

sweet potato oven fries

Sweet potato oven fries.* Kendal sometimes makes these late at night when I'm feeling snackish. They're great with grilled cheese and reruns of How I Met Your Mother.

First, you need some sweet potatoes.

one potato, two potato...
(These are not the same sweet potatoes that you're about to see getting baked. But I couldn't let this perfectly good sweet potato photo go to waste.)

Preheat your oven to 400 degrees. Then, line a baking sheet with some foil. Wash and dry the sweet potatoes, slice them into wedges, and place them on the baking sheet.

_DSC0404

Sprinkle on whatever seasonings you want. Kendal sometimes uses red pepper flakes, but he made this batch mild for Miss M's sake. He used a little kosher salt and our go-to Trader Joe's seasoning.

_DSC0408

Add a little oil--we used canola. Enough to coat the fries, but not so much that they're sitting in a pool of oil.

_DSC0409
(See? Glistening, not drowning.)

Put the tray of fries on the oven center rack, and bake at 400 degrees for 10 minutes. Begin catching up on the latest episode of How I Met Your Mother while you wait.

_DSC0410
(Yeah, Miss M is watching it, too. Don't judge.)

When the timer buzzes, flip over the fries.

_DSC0415
(Just flipped.)

Cook them for ten more minutes, or until they're whatever shade of brown that you prefer.

_DSC0423

Dip them in ketchup or barbecue sauce, or mayonnaise (if you're weird). Enjoy with the aforementioned grilled cheese sandwich and hilarious sitcom.

A quick note: Kendal usually peels the sweet potatoes, but this time he left the skin on. The skin was a little thick, so I ended up peeling it off Miss M's and my fries. Easy fix.


*(I struggled with calling them "fries" when they're really baked. But "sweet potato oven bakes" just sounds odd.)

Wednesday, February 15, 2012

One Way To Roast A Chicken

You know that old Paul Simon song, Fifty Ways To Leave Your Lover? Well, there are probably fifty ways to do just about anything, including roast a chicken.

Here is one way. The way Kendal did it most recently.*

Butter it up.

_DSC0326
(Poor, headless chickie-chickie. Sometimes I think I should be a vegetarian.)

While the oven is preheating to 500 degrees, rinse and dry the chicken and then coat it with enough butter to cover the whole bird.

Put it down.

Place the chicken in a roasting pan, breast side down, and cook for 20 minutes.

While the chicken is cooking, mix up a sauce with which to baste it. Kendal used Worcestershire sauce, barbecue sauce, Trader Joe's 21 Seasoning Salute, and 2-3 cloves of garlic (minced). No specific measurements, simply to taste.

Douse it.

After the first 20 minutes of cooking, baste the chicken with your mixture.

_DSC0333
(What it will look like at this stage.)

Flip it.

Now, flip that bird over, and baste the other side.

The chicken is now breast-side-up. Put it back in the oven this way, and cook for another 8 minutes.

Turn Down the Heat.

Turn the oven down to 325 degrees. Baste the chicken again. (Don't flip it over this time.) Cook for another 30 minutes, or until it is done. One way to tell if the chicken is done cooking is if the juices run clear when you pierce it.

_DSC0338
(Done!)

Be careful not to overcook it--too dry. Be careful not to undercook it--too salmonella-y. Cook it just right and it will be moist--gah! I hate that word, but it's the only one that fits--and delicious.


*Adapted from How To Cook Everything by Mark Bittman (p. 358).

Friday, February 10, 2012

Homemade Pizza

We love pizza, probably more than we should. When I was growing up, Friday night = pizza + TGIF. If you know what TGIF is, then you're probably at least 30 years old, and you just may be following Candace Cameron on Twitter.

Anyway, here's a fun way to do pizza at home. It's especially great for those nights when you want to break out one of your heavyweight wedding gifts:

_DSC0303

Yes, you'll be using that beautiful stand mixer...with the paddle and the dough hook.

Kendal adapted this pizza dough recipe.

For the dough:

3 cups unbleached white whole wheat flour
1 tsp. kosher salt
1 tsp. Trader Joe's 21 Seasoning Salute
1 (.25 oz.) package active dry yeast
1 tablespoon white sugar
1 cup warm water (110 degrees F)
2 tablespoons canola oil
1 tsp. honey

In your stand mixer bowl, mix together all the dry ingredients (except the sugar). You can stir them by hand, or if you're feeling fancy, you can use the paddle on your stand mixer.

To the cup of warm water, add the packet of yeast and the sugar. Stir, and let sit for about 5 minutes.

_DSC0304
(The yeast/sugar/water mixture brewing and bubbling.)

Next, add the canola oil and honey to the water mixture.

Add the water mixture to the dry ingredients in the stand mixer bowl. Use the dough hook when combining the ingredients, and let the mixer run for a few minutes until a nice dough forms.

_DSC0309
(This is the best shot I could get, because I'm not very tall. I'm going to have to start standing on a stool for these photos.)

Coat the dough with a small amount of canola oil, and let it sit while you prepare the other ingredients.

What are the other ingredients? Whatever you want to use as toppings. For this pizza, we used:

marinara sauce (we used Newman's Own)
approx. 8 oz. shredded mozzarella
red onion (we used about 1/4 of the onion)
about 1/3 lb. ground turkey, browned and seasoned with a little crushed red pepper

_DSC0306

_DSC0307

Roll out the dough on a baking stone. Layer on your toppings as you see fit. Kendal likes to have toppings dispersed throughout, so he spreads on the sauce, then adds the veggies and meat. Then he adds the cheese, and finally puts more meat and veggies on top of that.

Bake at 375 for 25 minutes. (We didn't preheat the oven, because we used a stone, and didn't want to have any mishaps like I've had in the past. Just so you know, a frozen pie + a hot stone = a broken stone.)

This is what the pizza looked like before we placed it in the oven...

_DSC0311

And this is how it looked when it came out...

_DSC0316

We like our cheese extra brown, so this was perfect.

One quick note: This recipe results in a pretty thick, soft crust. If you're in the mood for a thinner, crispier crust, then try this dough recipe here. Kendal tested it, I tasted it, and it's awesome. ("Awesome" is sung in my fake opera voice.)

Tuesday, January 24, 2012

Cornbread from Scratch

A few nights ago, Kendal made cornbread from scratch--something neither of us had tried before. Jiffy was the cornbread mix I grew up on, but Kendal and I don't use that one anymore since we found out it contains lard. Krusteaz has been a good replacement, but it's not always easy to find. So, we decided to make our own. By "we", I mean "Kendal", because he does most of the cooking around here. I like it that way.

Kendal adapted this recipe from the New York Times.

He used canola oil instead of the types of oil suggested in the Times recipe.
He used King Arthur unbleached white whole wheat flour instead of all-purpose flour.
And finally, he used kosher salt instead of finely ground salt.

I took pictures.

_DSC0266

_DSC0267

_DSC0268

_DSC0270

The taste? Fantastic, if you like your cornbread on the sweet side like I do. Kendal used 1/2 cup of sugar, so it was pretty...pretty...pretty...sweet. (I told him it tasted like cake made from corn.) You could always use less sugar. Or, instead of using sugar, you could experiment with using other sweeteners such as agave nectar. I've heard that agave nectar is lower on the glycemic index, so it doesn't cause that sugar energy spike-and-crash. (I use it in my oatmeal. It doesn't taste weird unless I accidentally use too much.)

When our one-year-old tried it, she did this sign and said "puh-peas" ("more, please"). Which is what she doesn't say when we feed her broccoli.